Stop Guessing and Actually Check Your Sony Hinges
If your Sony headphones feel wobbly, droopy, or "off," that does not always mean they are done for. On many Sony over-ear models, what feels like a dying headband is often a hinge or yoke that is wearing in specific, predictable ways. By checking those weak points in a consistent way, you can decide whether to keep using the headphones as-is, schedule a part upgrade, or line up replacement hinges before they fail in a bag or on a flight.
This checklist focuses on hinge behavior and common stress points on popular Sony models, especially:
- WH-1000XM3
- WH-1000XM4
- WH-1000XM5
- WH-CH710N
-
Representative older MDR over-ear models (such as MDR-7506-style swivels)
The emphasis here is on practical inspection and decisions that line up with real replacement parts available for these series, such as yokes, hinge arms, and headband cores.
Gather Simple Tools Before You Touch the Hinges
Before you start flexing or twisting anything, set out a few basics so you are not forcing a weak hinge while you hunt for problems. Recommended tools include a steel ruler or measuring tape with millimeters, a smartphone with a camera that can record slow-motion video, a small flashlight or bright desk lamp, sticky notes or painter’s tape, and a clean, stable, flat surface (table or desk). If you have one, a basic digital caliper (0.1 mm resolution) is optional but helpful.
Each tool has a specific role. A ruler or tape lets you measure the gap between earcups and the table and compare left vs. right hinge alignment, while a phone camera can zoom into tight hinge pockets and capture small, jerky movements in slow motion. A flashlight helps reveal fine stress lines and whitening on dark plastics, especially around Sony’s WH-1000X yokes. Sticky notes or tape work well as visible flags next to suspicious areas so you can find them again, and a digital caliper provides more precise gap and misalignment measurements to track changes over weeks.
Before you start, do the basics to avoid creating damage while you inspect. Power the headphones off and disconnect all cables, then wipe the headband and cups with a soft, slightly damp cloth so dust and skin oils are not masking fine cracks. As you clean, avoid twisting the headband, especially if you already suspect hinge damage.
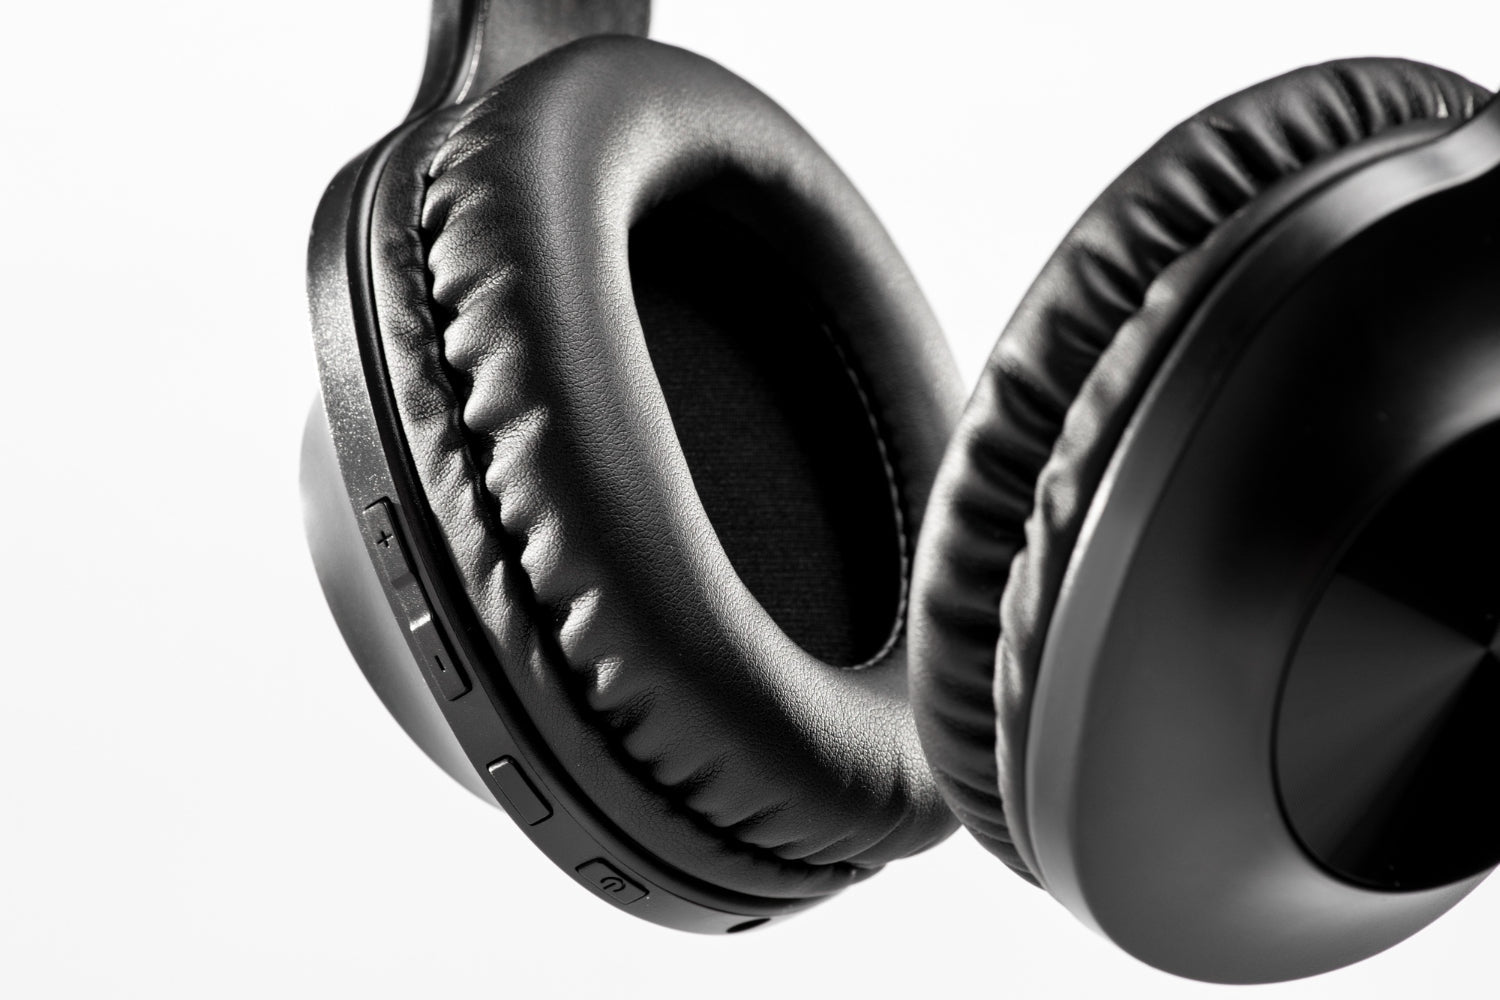
Visual Hinge Inspection: Model-Specific Stress Zones
Lay the headphones on a table with both earcups in their normal listening position. For each side, inspect the hinge from three angles:
- Outside shell where the yoke meets the earcup
- Inside arm closer to the headband
- Underside pivot area where parts rotate
Use the flashlight and your phone’s zoom to look for the classic signs of hinge stress and separation. Specifically, watch for hairline stress cracks along thin plastic bridges, white "stress whitening" on black or dark gray plastic, flaking or chipped paint exactly at the pivot or screw locations, and tiny gaps where two parts used to sit flush but now separate slightly.
On specific Sony lines, these problems show up in consistent places:
- WH-1000xm3: Hairline cracks often begin at the top of the plastic yoke where it wraps around the earcup pivot. Stress whitening can appear on the inner side of the hinge arm, close to the headband side, before the plastic actually opens up.
- WH-1000xm4: Similar geometry to XM3, but the hinge cover shape is slightly refined. Cracks still tend to start on the narrowest part of the yoke just above the cup. On some units, the paint around the pivot screw can chip first; look for that as a sign of underlying flex.
- WH-1000xm5: Uses a different headband and hinge design, with slimmer arms. Watch for whitening or fine lines where the thin arm transitions into the wider cup mount. Because the arms are more slender, even short cracks crossing the narrowest section deserve attention.
- WH-CH710N: Lighter plastic construction; stress whitening often shows on the outer hinge cover near the swivel point. Cracks may follow the molded seam lines, so follow those seams carefully with the flashlight.
-
Older MDR Models (E.g., MDR-7506-Style): Swivel joints at the cup mount can loosen first; inspect the metal or plastic pivot plate and any visible screws. Cracks often track around the circular pivot housing or at the thin bridge between the swivel and the headband slider.
Whenever you see something questionable, mark it so you can re-find it later and compare changes. Tear a small piece of sticky note or tape, place it beside (not on top of) the crack or whitening, and write a simple label like "L outside yoke" or "R inner pivot."
Then take clear close-up photos from consistent angles so your follow-up checks are meaningful:
- Left: front, back, underside of the hinge area
- Right: front, back, underside of the hinge area
Create a dated folder on your phone for this inspection and save the photos there. This gives you a reference if you re-check after a busy travel period and want to see whether a line or gap has grown.
Some wear is only cosmetic, while other signs point to real structural risk. Cosmetic issues typically look like light scuffs or surface scratches in the paint, or small chips that stay in thicker plastic zones and do not cross narrow arms. Structural risk is more about placement and behavior: cracks crossing the thinnest part of the yoke or hinge arm, stress whitening exactly on those narrow bridges, or loosened/backed-out hinge screws (on models that use visible fasteners).
On many WH-1000XM3/XM4 units, the first serious warning sign is a hairline crack or whitening at the top of the yoke, near the point where the earcup’s metal pivot pin is captured. On lightweight models like WH-CH710N, the outer hinge cover and the narrow internal support ribs deserve particular attention.
Measure Hinge Alignment and Play with Simple Tests
Once you have a visual sense of the hinge condition, check how straight and how loose the hinges really are. These tests add objective data (and often confirm what your hands already suspect).
Table Alignment Test
1. Extend both sliders the same amount. Either count the visible notches or measure the metal band showing on each side.
2. Place the headband on a flat table so the curve rests naturally.
3. Let both earcups hang down and just touch the table.
Check for:
- One cup sitting higher or lower than the other
- One cup tilting inward or outward more than its mate
- Different front vs. back gaps between the bottom of the cups and the table
Use a ruler or caliper to measure the gap from the table to:
- Front bottom edge of left cup
- Back bottom edge of left cup
- Front bottom edge of right cup
- Back bottom edge of right cup
Write these down with a date so you can track drift over time. For example:
- WH-1000XM4, L front: 12.5 mm, L back: 13.0 mm, R front: 13.0 mm, R back: 13.0 mm
As a rule of thumb on these Sony over-ear models, side-to-side differences under about 1, 2 mm usually indicate minor, normal variation. Differences in the 3, 4 mm range, especially if one cup will not sit level, point to meaningful hinge or yoke wear.
"Twist and Drop" Play Test
1. Hold the headband at the center with one hand.
2. Lift the headphones a few inches so the cups hang freely.
3. Set your phone to slow-motion video and point it at one hinge.
4. With your other hand, gently rock that earcup forward and back, then side to side.
You are feeling for how much free movement occurs before you feel solid resistance. That free movement is mechanical play in the hinge.
Repeat on the other side and compare:
- Does one hinge have more free travel before it firms up?
- Do you hear small clicks, pops, or a creaking sound when you change direction?
-
Can you see the hinge housing flex independently of the cup or headband?
On WH-1000XM3/XM4, a small amount of silent play around the swivel is common. A noticeably looser feel on one side, especially accompanied by a visible crack, is a sign that the hinge arm or yoke is starting to separate around the pivot point.
Decide Whether to Keep Using, Reinforce, OR Replace Parts
With photos, notes, and measurements, you can make a more concrete decision about what to do next. The goal is not to panic over tiny marks, but to match the severity of what you see to a sensible next step.
Normal Wear
If you see no cracks (or only tiny marks that have not changed between inspections), play feels light and quiet on both sides with a similar feel left vs. right, and alignment differences stay under about 1, 2 mm, you are likely in normal-wear territory. Keep using the headphones and plan a quick re-check once a month or before long trips, and save your measurements so you know what "normal" looks like for your specific unit.
Early Failure Signs
Early failure signs include stress whitening at hinge arms or yokes (especially on WH-1000XM3/XM4/TM5 and WH-CH710N), hairline cracks that cross thin plastic bridges at the yoke or hinge arm, uneven play between left and right hinges, and alignment differences in the 2, 4 mm range, or a cup that tends to tilt off-level.
At this stage, it is worth planning reinforcement using stronger structural parts designed for your model. Depending on the series, that can mean:
- WH-1000xm3 / WH-1000xm4: replacing the plastic yokes with reinforced versions designed to handle more pivot stress, or swapping in hinge kits that replace the cracked arm and associated brackets.
- WH-1000xm5: upgrading to hinge arm parts that use tougher materials at the thin transition zones.
- WH-CH710N: replacing the stock hinge covers and internal support pieces if they show whitening or hairline splits.
-
MDR Over-Ear Models: replacing worn swivel plates, hinge brackets, or headband forks that have loosened at the screw locations.
This type of targeted hinge or yoke replacement can extend the usable life of a headphone you already like, instead of moving straight to a completely new pair.
Imminent Failure
Imminent failure looks and feels more dramatic: deep or spreading cracks that grow away from the pivot area, loud clicking/grinding/binding when you move the cups, or more than 4 mm of misalignment (or a cup that cannot hold a stable position). In this situation, the hinge is at real risk of snapping during a commute, flight, or workout, and on many Sony models the failure can be sudden once the crack crosses a critical narrow section of the yoke or arm.
Instead of waiting for a full break:
- Identify the exact hinge or yoke part used on your model (left vs. right, color, generation).
- Plan to replace that part and any associated brackets or covers that show stress.
- If you work with a repair shop, bring your notes and photos so they can source the correct parts more quickly.
How Parts Fit Into This Process
The purpose of this checklist is to help you time your parts decisions. Early inspections show when standard Sony yokes and hinges are still safe to use, while measured misalignment and play indicate when it is smart to look for reinforced hinge arms, upgraded yoke kits, or more durable headband cores. Detailed photos also help you match replacement parts (left vs. right, finish, revision) for WH-1000X, WH-CH, and MDR series headphones.
Replacement parts and upgrade kits are designed so you can address these weak points yourself or through a repair shop, rather than giving up on the entire headphone as soon as the first hairline crack appears.
Turn Your Hinge Check Into a Seasonal Habit
Hinges take the most abuse when the headphones are folded, packed, and grabbed by the headband. That happens most often when life gets busy: travel seasons, school terms, commute changes.
You can turn this hinge inspection into a simple routine:
- Do a full hinge inspection before big trips or the start of a heavy commute period.
- Repeat the alignment and play measurements every month or two.
- Update your photo folder when you notice new whitening, cracks, or a change in how stiff the hinge feels.
Pair hinge checks with basic care:
- Wipe down ear pads and the headband so sweat and oils do not creep into seams and plastic joints.
- Slide each extender in and out to confirm smooth, even clicks and to check for any grinding or binding.
- Inspect any detachable cables for kinks, stressed strain reliefs, or bent connectors.
- Decide whether common wear parts like pads, sliders, or hinges are due for a refresh before a demanding travel or work period.
By catching stress signals in the hinge early, and relating them to real, model-specific parts, you can choose when to keep using your Sony headphones as-is and when it makes sense to upgrade the hinge hardware, swap in new yokes, or replace key structural components before a small crack turns into a complete break.
Get Your Favorite Sony Headphones Working Again
If your Sony headphones are broken, we can help you bring them back to life with the right parts and guidance. At CentralSound, we focus on making repairs straightforward so you can keep the sound you love without replacing your gear. Explore the parts you need, and if you are unsure what to choose or how to fix an issue, contact us so we can point you in the right direction.

Leave a comment
All comments are moderated before being published.
This site is protected by hCaptcha and the hCaptcha Privacy Policy and Terms of Service apply.